

Skip to main contentSkip to footer

Isolated USB 4-20mA Current Loop Transmitter (3-Wire) – Kappa4413USB

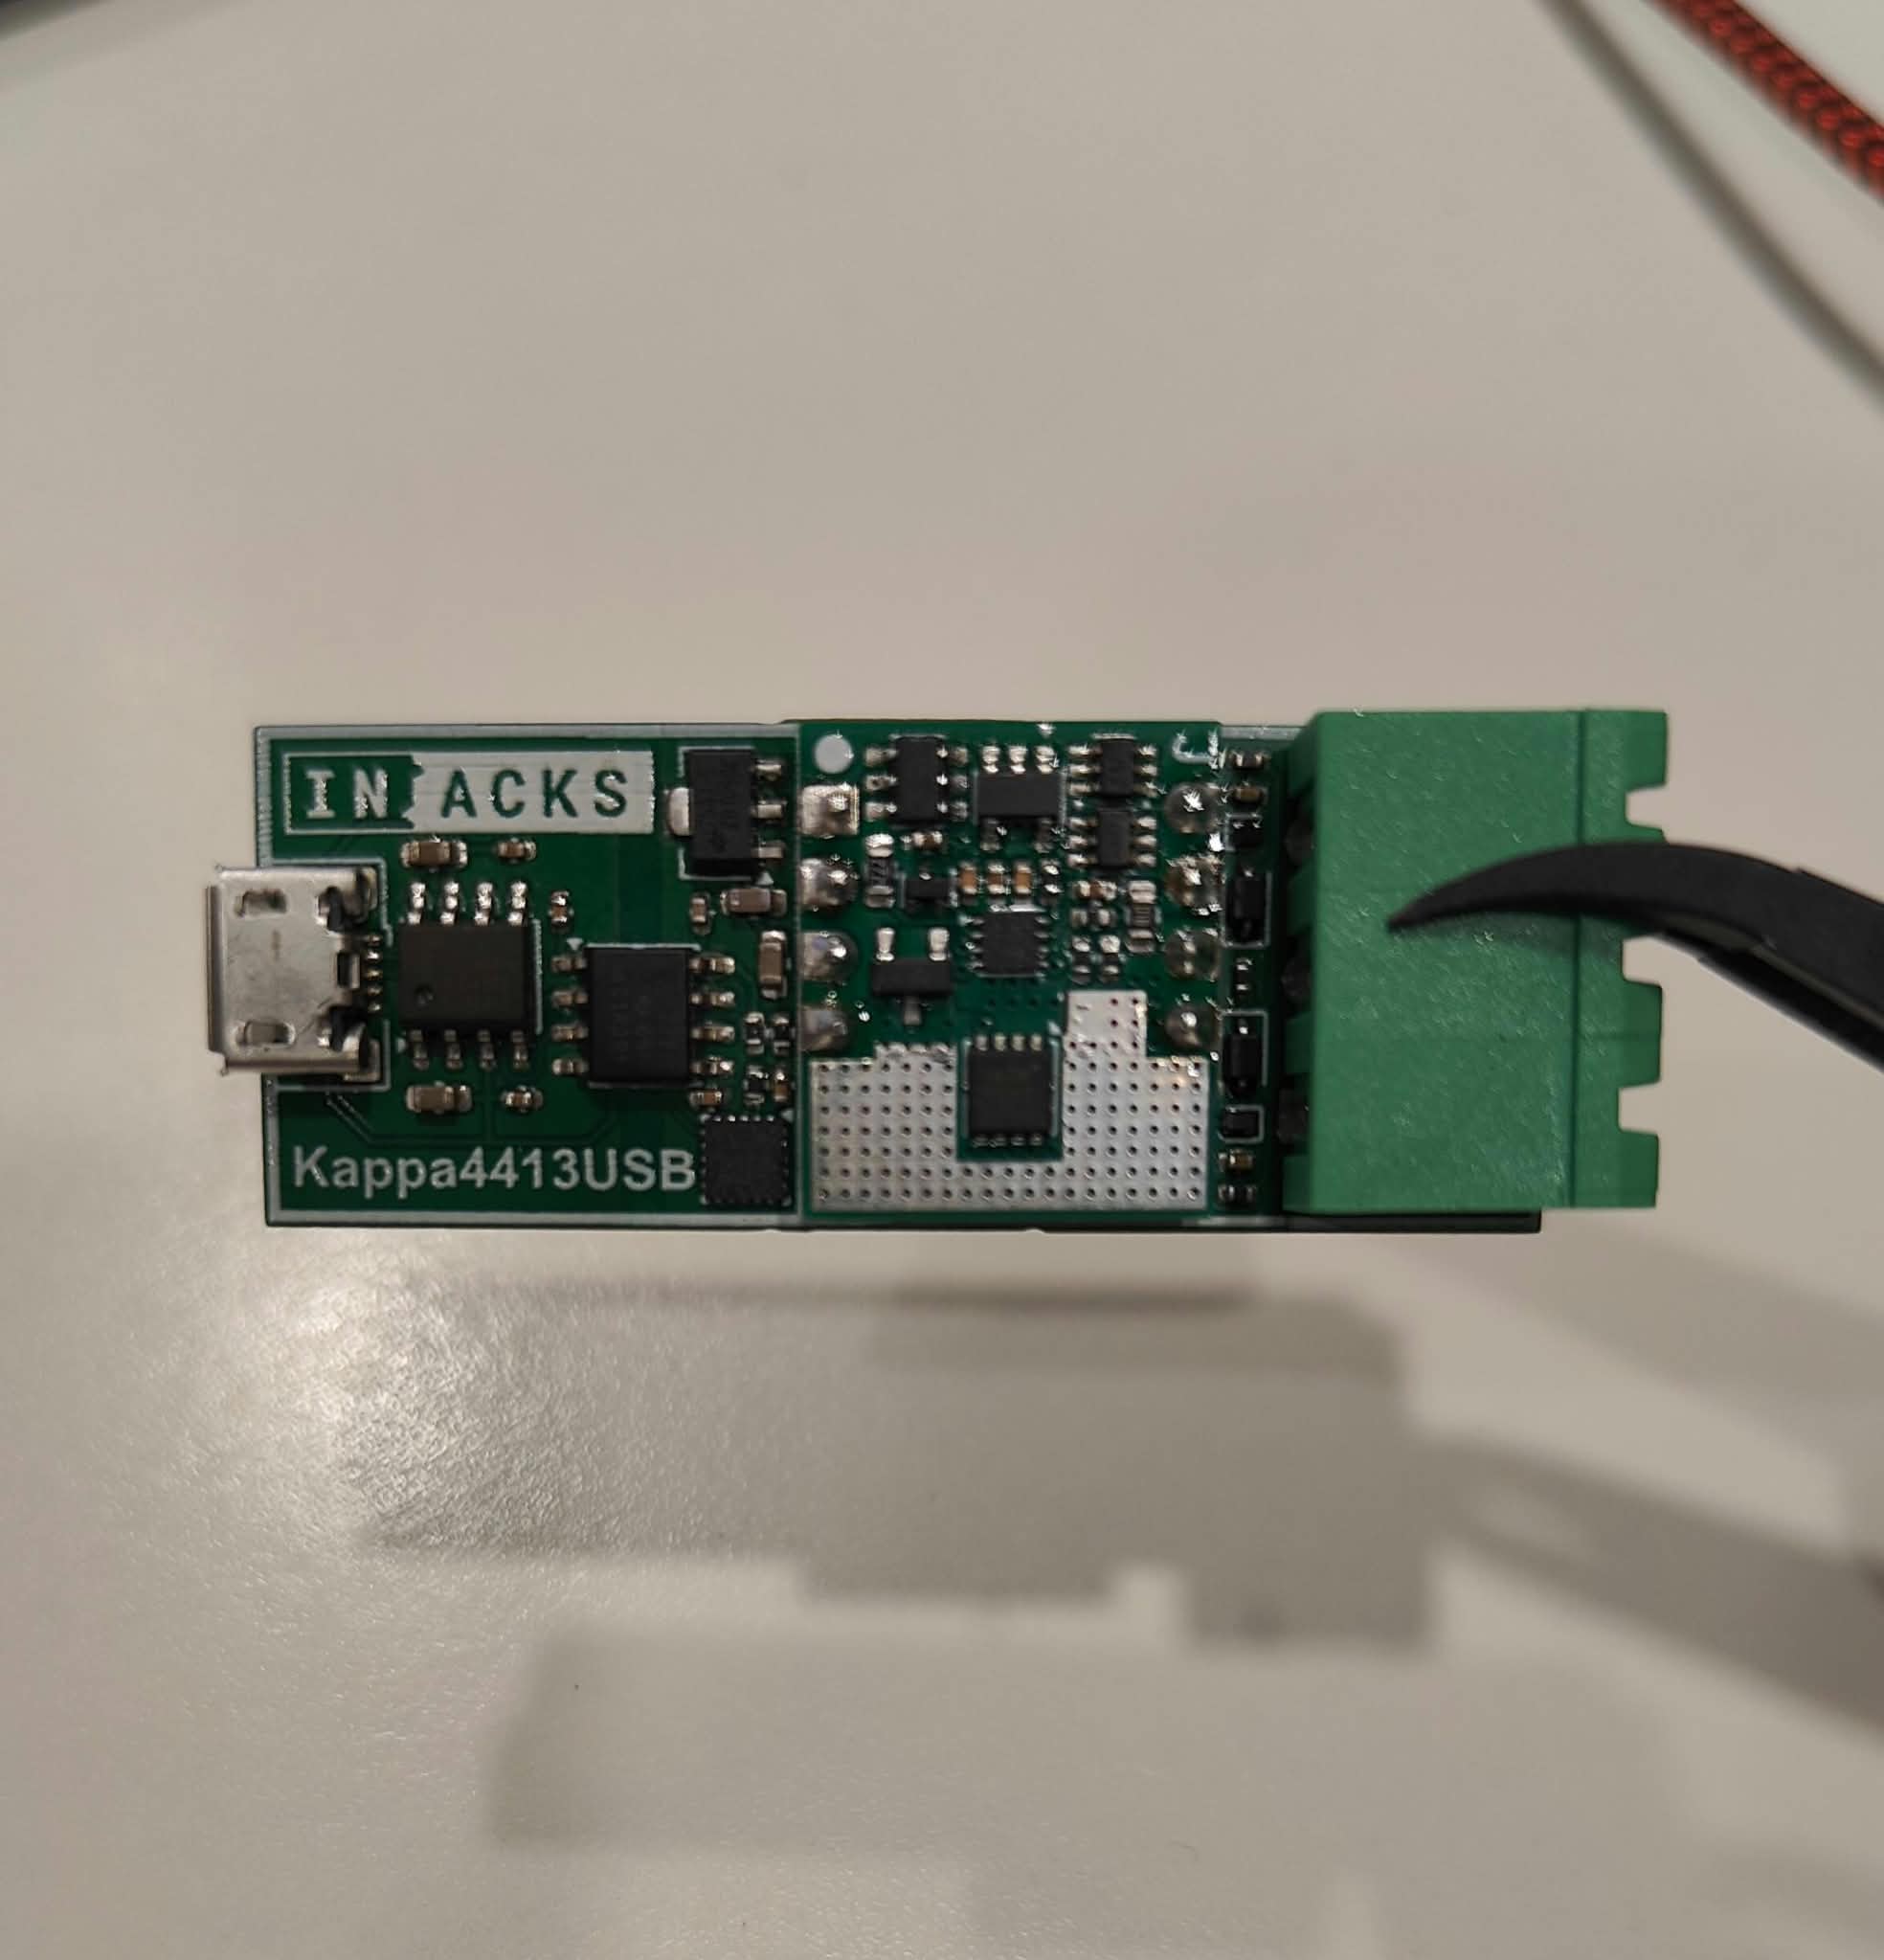
Isolated USB 4-20mA transmitter (3-wire) based on the IS4413-M1 module. Control the loop current from your PC without writing any firmware.

Available Commands:
– Set Current Value (0 to 4095)
– Set Default Value (safe power-up current)
– Firmware Version

PC Interface:
– USB Micro-B, virtual COM port
– 115200 baud, 8N1, no flow control
– ASCII text commands from any serial terminal

Current Loop Output:
– Output current: 0 mA to 22 mA
– Resolution: 12-bit
– Power supply: 24 V
– Pluggable screw terminal: COUT, GND, 24V

Protections:
– Galvanic isolation between USB and current loop
– Reverse polarity protection on the 24 V input
– Reverse current protection on COUT
– TVS diodes and EMI filters

In stock

SKU: Kappa4413USB

Isolated USB 4-20mA Transmitter for Your PC

The Kappa4413USB is an isolated USB 4-20mA transmitter (3-wire configuration) based on the IS4413-M1 I2C 4-20mA current loop transmitter module. Because the board handles the I2C side, you can generate a current loop signal from a PC without writing any firmware. Just send simple text commands through a virtual COM port, from any serial terminal program or from your own software.

Use this USB 4-20mA transmitter to evaluate the IS4413-M1 before integrating it into your own product. It also works as a ready-to-use PC-controlled current source on your bench or production line.

Applications

  • PLC testing: test and calibrate PLC analog inputs before commissioning.
  • Sensor simulation: simulate 4-20mA sensors and transmitters while you develop your control system.
  • Actuator control: drive current loop actuators directly from your PC.
  • Test automation: automate laboratory and production tests from your own scripts, for example in Python.
  • Fault simulation: generate currents below 4 mA or above 20 mA, so you can test saturation and fault detection.

How the USB 4-20mA Transmitter Works

The PC sees the Kappa4413USB as a standard serial (COM) port. When a command arrives, the on-board microcontroller checks it and sends the corresponding I2C command to the IS4413-M1. The IS4413-M1 then generates the loop current on the COUT terminal. Finally, the microcontroller replies to the PC with OK, an error code or the requested data.

A digital isolator galvanically separates the USB side from the current loop side. As a result, the PC ground and the current loop ground stay separate. This prevents ground loops and protects your PC from the current loop wiring.

Three Simple Commands

You set the output current with a 12-bit value: 0 generates 0 mA, while 4095 generates approximately 22 mA.

  • 3640 – Set Current Value: updates the output current. For example, 3640 is approximately 20 mA.
  • 0d – Set Default Value: updates the output current and also saves it as the safe power-up current.
  • ver – Firmware Version: returns the firmware version number.

Every command receives a one-line reply. When the Kappa4413USB cannot execute a command, it replies with an error code (ERR1 to ERR9) and a short description.

Works with Your Tools

The board works on Windows, Linux and macOS, and it also uses standard serial settings (115200 baud, 8N1). Use any serial terminal program, such as PuTTY, Tera Term or CoolTerm. Alternatively, control the board from your own scripts with the ready-to-use Python example in the user manual.

Hardware Features

  • USB Micro-B connector with a PL2303GL USB-to-UART bridge.
  • Galvanic isolation between the USB side and the current loop side.
  • 3-way pluggable screw terminal for the 24 V power supply and the current loop output: COUT, GND and 24V.
  • 24 V supply for the IS4413-M1, the current loop and the microcontroller, while USB powers the USB side.
  • Protections: reverse polarity protection on the 24 V input, reverse current protection on COUT, TVS diodes and EMI filters.
  • Configurable safe power-up current, stored in the IS4413-M1 EEPROM.

Quick Start with the USB 4-20mA Transmitter

  1. Connect the 24 V power supply and your receiver (for example, a PLC analog input) to the screw terminal.
  2. Then, connect the Kappa4413USB to your PC with a USB cable and switch on the 24 V power supply.
  3. Open the COM port at 115200 baud, 8N1, with a serial terminal program.
  4. Finally, type 725 and press Enter. The Kappa4413USB replies OK and the output current changes to approximately 4 mA.

For the wiring details, the complete communication protocol and the examples, see the Kappa4413USB User Manual (ISDOC157). In addition, the IS4413-M1 datasheet (ISDOC150) covers the detailed specifications of the module.

This company and the products provided herein are developed independently and are not affiliated with, endorsed by, or associated with any official protocol or standardization entity. All trademarks, names, and references to specific protocols remain the property of their respective owners.

(This product includes the Kappa4413USB. The 24 V power supply and the current loop receiver are not included.)
Q: What is the Kappa4413USB used for?

A: To generate a 4-20mA current loop signal from a PC. Use it to evaluate the IS4413-M1 module before integrating it into your own design, or as a PC-controlled current source to test and calibrate PLC analog inputs, simulate sensors and transmitters, drive current loop actuators, or automate laboratory and production tests.

Q: Do I need to write any firmware or install any libraries?

A: No. The Kappa4413USB firmware converts simple text commands into IS4413-M1 I2C commands. Just open the COM port and send the commands from any serial terminal program or from your own software.

Q: Which commands are available?

A: Three commands, each sent as one line of text ending with Enter:

  • <value> – Set Current Value: sets the output current (value from 0 to 4095).
  • <value>d – Set Default Value: sets the output current and stores it as the safe power-up current.
  • ver – Firmware Version: returns the firmware version number.

The Kappa4413USB answers every command with OK, the requested data, or an error code (ERR1 to ERR9) with a short description.

Q: What output current range does it support?

A: From 0 mA to approximately 22 mA, with 12-bit resolution (values 0 to 4095). Besides the standard 4-20mA range, you can generate currents below 4 mA and above 20 mA to simulate saturation and fault conditions. Approximate values: 4 mA = 725, 8 mA = 1454, 12 mA = 2182, 16 mA = 2911, 20 mA = 3640.

Q: How accurate is the output current?

A: The board is ready to use, and no calibration is required for general use. The values above are approximate: the exact current depends slightly on each unit and on the temperature. For maximum accuracy, measure the output current at two values (for example, near 4 mA and near 20 mA) and calculate your values from these measurements, as the Python example in the user manual does.

Q: Is the USB port isolated from the current loop?

A: Yes. A digital isolator galvanically separates the USB side from the current loop side. The PC ground and the current loop ground are not connected, which prevents ground loops and protects your PC from the current loop wiring.

Q: What power supply do I need?

A: A 24 V power supply, connected to the 24V and GND terminals. It powers the IS4413-M1, the current loop and the microcontroller, while the USB side is powered from the USB port. The COM port appears as soon as you connect the USB cable, but the Kappa4413USB only answers commands while the 24 V supply is connected.

Q: How do I wire the current loop?

A: Connect COUT to the input (+) of your current loop receiver, typically a PLC analog input or a 250 Ω resistor. As the Kappa4413USB is a 3-wire transmitter, connect the receiver return (−) and the negative (−) of the 24 V power supply to the GND terminal.

Q: What happens at power-up?

A: The IS4413-M1 generates its stored safe power-up current, and the Kappa4413USB does not change it until it receives a command from the PC. Setting it to 0 mA (command 0d) prevents the receiver from interpreting the output as a valid measurement before your software takes control. As the value is stored in EEPROM, use the Set Default Value command only to change the power-up current, not to update the output continuously.

Q: Which operating systems are supported?

A: Windows, Linux and macOS. The Kappa4413USB uses a Prolific PL2303GL USB-to-UART bridge, which the PC sees as a standard serial port. On Windows, the driver is usually installed automatically. Recent Linux kernels include the pl2303 driver. On macOS, install the PL2303 driver from the Prolific website if the port does not appear.

Q: Can I control it from my own software?

A: Yes. Any software that can open a serial port can control the Kappa4413USB, for example Python, C#, LabVIEW or MATLAB. The user manual includes a ready-to-use Python 3 example based on the pyserial library.

Q: What is included?

A: The Kappa4413USB board. The 24 V power supply and the current loop receiver are not included.

Python Example

This example controls the Kappa4413USB from a Python 3 script with the pyserial library (install it with pip install pyserial). It defines a small Kappa4413USB class that you can reuse in your own scripts:

  • send() sends one command, reads the reply and raises an exception if the Kappa4413USB answers with an error or does not answer.
  • version(), set_value() and set_default() implement the three commands.
  • set_ma() converts a current in mA into a value, using the two points VALUE_AT_4MA and VALUE_AT_20MA. Replace them with your own measurements for better accuracy.

Before running it, set PORT to the COM port of your Kappa4413USB. The script reads the firmware version, stores 0 mA as the power-up current, generates 4, 8, 12, 16 and 20 mA for two seconds each and finally shows how an error is reported.

# -----------------------------------------------------------------------------
# Kappa4413USB - Python example
# Controls the IS4413-M1 output current from a PC through the Kappa4413USB.
# Requirements: Python 3 and pyserial (install with: pip install pyserial)
# -----------------------------------------------------------------------------
import time
import serial

PORT = "COM3"   # Windows: "COM3", Linux: "/dev/ttyUSB0"

# Approximate conversion from mA to output value (0..4095).
# For the best accuracy, calibrate your unit and replace these two points.
VALUE_AT_4MA = 725
VALUE_AT_20MA = 3640


class Kappa4413USB:
    def __init__(self, port):
        # 115200 baud, 8 data bits, no parity, 1 stop bit (8N1)
        self.ser = serial.Serial(port, 115200, timeout=1)
        self.ser.reset_input_buffer()

    def close(self):
        self.ser.close()

    def send(self, command):
        """Sends one command and returns the reply without the line ending."""
        self.ser.write((command + "\n").encode("ascii"))
        reply = self.ser.readline().decode("ascii").strip()
        if reply == "":
            raise TimeoutError("No reply: check the COM port and the 24 V supply")
        if reply.startswith("ERR"):
            raise RuntimeError(reply)
        return reply

    def version(self):
        """Returns the firmware version number."""
        return int(self.send("ver"))

    def set_value(self, value):
        """Set Current Value: updates the output current (value 0..4095)."""
        self.send(str(value))

    def set_default(self, value):
        """Set Default Value: stores the power-up current in the IS4413-M1."""
        self.send(str(value) + "d")

    def set_ma(self, ma):
        """Sets the output current in mA using the conversion points above."""
        value = VALUE_AT_4MA + (ma - 4) * (VALUE_AT_20MA - VALUE_AT_4MA) / 16
        self.set_value(max(0, min(4095, round(value))))


kappa = Kappa4413USB(PORT)
try:
    print("Firmware version:", kappa.version())

    # Optional, only needed once: output 0 mA at power-up (safe power-up)
    kappa.set_default(0)

    # Generate 4, 8, 12, 16 and 20 mA, two seconds each
    for ma in (4, 8, 12, 16, 20):
        kappa.set_ma(ma)
        print("Output set to", ma, "mA")
        time.sleep(2)

    # Errors reported by the Kappa4413USB raise an exception
    try:
        kappa.set_value(5000)
    except RuntimeError as error:
        print("Kappa4413USB answered:", error)
finally:
    kappa.close()

Output of the script:

Firmware version: 1
Output set to 4 mA
Output set to 8 mA
Output set to 12 mA
Output set to 16 mA
Output set to 20 mA
Kappa4413USB answered: ERR2: value out of range, must be 0 to 4095

For the serial terminal example and the complete communication protocol, see the Kappa4413USB User Manual (ISDOC157).

Evaluation boards, Modules & other related products

Evaluation boards, modules, and accessories designed for fast prototyping and easy integration. Featuring standard interfaces and built-in transceivers, they simplify testing and development across platforms like Arduino, Nucleo, or Raspberry Pi. Ideal for adding RS485, RS232, or Ethernet functionality with minimal effort and maximum compatibility.

Have a question?

Fill out this field
Please enter a valid email address.
Fill out this field
You need to agree with the terms to proceed